Showing posts with label Sewing. Show all posts

Monday, May 31, 2010

Mikey & Molly Monkey

For Christmas last year, I made my (then) almost 3 year old boy/girl twins a set of monkey twins named Mikey and Molly...


The FREE pattern for Molly Monkey can be found here. The pattern includes a few accessories, like a beret and shoes, but I ran out of time to make these. I think she looks gorgeous enough without them anyway!


The pattern for Mikey Monkey is available for purchase here. Mikey has two shirt options - a T-shirt or a shirt and tie, which I think is just adorable. His pattern also includes some cool accessories - a baseball cap, tennis shoes and a pirate set. Again, I ran out of time to make these, but given how much my son adores his monkey, I might just surprise him with these one day!


Both patterns were designed by Larissa at mmmcrafts. I just love her work (I have also made her Tooth Fairy Pillow), and have found the patterns easy to follow.

Saturday, May 22, 2010

Tooth Fairy Pillow

I just love this cute felt Tooth Fairy Pillow from Larissa at mmmcrafts. It was really quick, easy and fun to make. Instructions are given for additional embellishments (like a skirt, crown and fairy wings), but I decided to keep mine plain and simple, partly because I ran out of time and partly because I wanted to keep it gender neutral so my son will also be able to use it when his time comes.
We've had fun using the pillow. When my daughter loses a tooth, we carefully place it in the mouth of the pillow, which is then hung on the door knob on the outside of her bedroom door. Next morning, we wake up to find the tooth has been replaced with a coin! I'm sure the Tooth Fairy appreciates not having to sneak into the sleeping child's room and fumble around for a tooth, especially on a Friday night when she has probably shared a bottle of wine with Mr Tooth Fairy ;-)

If you would like to make your own Tooth Fairy Pillow, the instructions and free pattern can be found here. I have noticed that since I made my pillow, Larissa has posted a small amendment to her pattern, suggesting some top stiching around the mouth will stop the mouth stretching so much with repeated use (you can see in the picture above that mine has stretched a bit).

Friday, April 30, 2010

Fleecie Pets


About six years ago I made a basic 8-colour patchwork blanket out of fleece. I had a narrow strip of each colour left over from that project and of course managed to convince myself that I needed to keep the surplus fabric because I would be sure to find a use for it one day. Imagine my delight when I found this book containing patterns and instructions to make gorgeous little toys out of, you guessed it, narrow strips of fleece!

I had a couple of problems when I started to make my Fleecie Pets. Firstly, which pet was I going to make first...Squealy the piglet, Joe the monkey, Leapy the frog, Hoppy the rabbit, Spangles the cat, Patches the dog, Sniffy the mouse or Fuzzy the sheep? My second, and more concerning problem was that my fleece off-cuts were agonisingly too narrow for the pattern pieces! I managed to solve the latter problem by scanning the patterns and reducing their size a little before printing them out. Crisis averted!

In the end I managed to make five pets, along with some of the cute outfits in time for my 4yo daughter's birthday. The sewing and knitting patterns were very easy to follow. I'm sure it would have been even easier had I been making the full-sized pets, as at times the sewing was a little bit fiddly. I also had a little trouble figuring out how to re-size the knitting patterns (I ended up opting for slightly smaller needles) so the knitted components were a little too big.


Wednesday, March 31, 2010

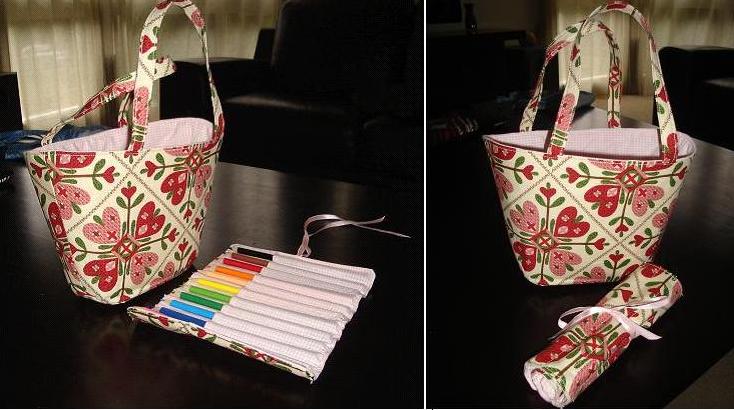
Bag and Pencil Roll

This was a gift I made for a 7 year old girl...


The child's bag was made using a Simplicity pattern (5531) that I had purchased a few years ago. The matching pencil roll was adapted from One Red Robin's Notebook & Pencil Holder tutorial. To work out how wide to cut the fabric, I allowed 2cm per pencil and then added a 1cm seam allowance on each end. To figure out the height, I measured a pencil and again added 1cm seam allowances to each end. The pencil tips were a bit too close to the edge for my liking, so next time I make one I think I will and one more extra centimetre to the height.

Tuesday, March 23, 2010

Colouring Book & Pencil Holder for a 4 year old boy

This is a gift I made for a four year old boy. I followed One Red Robin's Notebook & Pencil Holder tutorial. Instead of fastening it with ribbon, which I thought was a bit too girly, I sewed a black button to the front and a piece of black elastic (I actually used a hair band!) to the back (the elastic was sewn into the seams in the same way as the ribbon in the tutorial).

I teamed the pencil holder with a handmade colouring book, using Chez Beeper Babe's fantastic tutorial. I found some colouring pages featuring some of the birthday boy's favourite characters on this site. I personalised the colouring book by printing his name on the front cover.


I have since made countless versions of the colouring book and pencil holder for my kids and their friends...and they just loved them! When I have some more free time, I would like to have a go at making the colouring pages more personalised by either drawing some pictures myself, having the kids draw some pictures, or even altering our family photographs in photoshop.